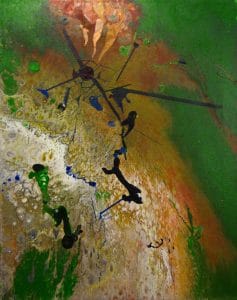
High Wire Act 20×16″ on stretched cotton canvas Most of the larger shapes are dried skins from pours. The fine lines and straight lines are archival markers.
I’ve been looking at this for a couple weeks and can’t decide anything to add, so I’ll call it finished. I won’t varnish it just yet–keeping it out of sight for a while will give me fresh eyes to see it again in a couple months and then prepare it for selling.
For an earlier version of this piece see my post of October 14, 2017. Any comments? Thanks for visiting.
A Review of methods of producing crackled texture effects in paintings.
Crackle Paste – A Golden product that requires a rigid substrate and thick application. Doesn’t work on Yupo or paper. Somewhat chalky.
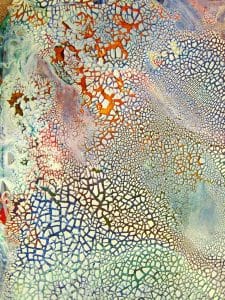
Kroma Crackle – from Kroma Industries. Relatively new product. Thinner application and can be used on flexible substrate. Takes a long time to dry–even in the winter time with humidity low in the studio. It is somewhat fragile when it starts to dry. Can easily be limited to smaller areas. Dries to a chalky white color, with the darker color underneath as the cracks. Then it can be painted on top as desired, with either watercolor or acrylic paint.
Kroma Crackle – after completely dry. Cracks vary according to the thickness of the application. A few pieces of the dry compound have brushed off in handling.
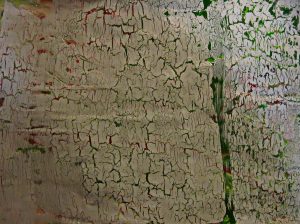
Crackle Glaze – made by Poly Vine Industries. Designed to be used with flat Latex paint. Gives interesting cracked effect. And looks good, and probably can easily be localized as needed and still look natural.
Surface after Crackle Glaze used. On the left hand two thirds it was painted with a very light blue latex interior paint. On the right I used gesso, tinted a bit with blue India ink.
Stamping – totally repetitive and no control over size of crackles. The stamp I have has rather large spaces.
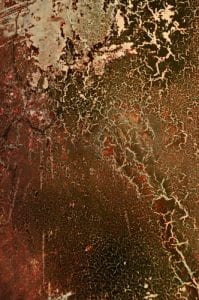
Organic based spray paint over water wetted substrate. Can be on a flexible substrate, but very unstable and fragile till coated with fixative of some sort. I have used this in multiple paintings on Yupo with good, quite subtle results. Generally limited to small areas. Not predictable size of cracks.
Black commercial spray paint (in pressurized cans) over a wet surface of reddish acrylic paint.
Dirty Pour – simulates crackling a little bit in some areas, but totally unpredictable and very hard to control in all aspects.
Hand painting … very tedious and almost impossible to get looking natural.
Conclusion: come back next time, hopefully in a few days. In the meantime, thanks for reading, and if you have any questions or additions please comment. The link is just under the title.
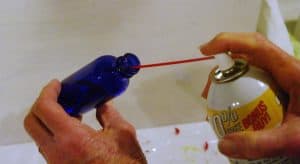
People have complained about the smell of using Silicone spray in doing their dirty pours. The solution is two-fold: Use an already liquid silicone oil, or make your own oil. I have a 2 oz. dropper bottle that I take outside and spray the silicone from the pressurized container into the bottle. This eliminates the odor of the spray itself when using it indoors. Then I can just add 5-8 drops of this silicone to each color cup with almost no odor.
Here’s the way it looks:
Notice the tip of the tubing is a little less than half way into the bottle. This allows the liquid silicone to run into the bottom of the bottle and the propellant to come out without loss of the oil. Also note that I’m spraying into the side of the bottle.
Have you found any other ways of dealing with the odor of the spray? If so please say in the comments. Thanks.